Crunchies- South African Oat Biscuits
Crunchies are a classic South African oat biscuit, really simple, quick to stir together and are quite addictive. A great bake for spur of the moment guests and wanting to bake children and grandchildren. These biscuits use just two bowls and a spoon and usually you have all the ingredients in your cupboards. I love how in 30 minutes from mixing to baking you can have a substantial amount of biscuits, filling your tin or jar.
If you use Gluten Free Oats (not all oats are) and dairy free margarine, the Crunchies can be served to Vegan, Lactose Intolerant and Gluten Free friends and family.
Crunchies make an easy homemade lunch box addition (checking no one is allergic to coconut before packing them into any school lunch boxes though) and a great snack for children travelling off to Uni and as a treat in the exam times for studying teenagers.
I am reluctant, in the current climate, to say that they are healthy as there is sugar in the biscuits, but they are better than the shop-bought full of preservatives snack bars the children gravitate towards or as parents we keep for convenience, when you are time-poor.
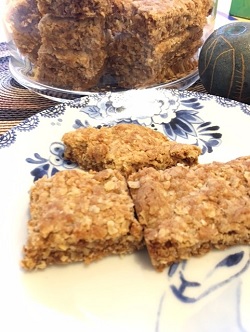
Soft Bake Oat Biscuits
The supermarkets seem to be selling a lot of soft baked biscuits and snack bars. To achieve a soft baked rather than crunchy Crunchie, take the bars out 5-8 minutes before the cooking time, as shown in the photo below.
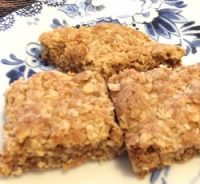
Soft Baked Crunchies Classic Crunchies

- 2 cups Plain Flour
- 2 cups Desiccated Coconut
- 1 ¼ cups Light Muscovado Sugar
- 2 cups Porridge Oats
- 2 teaspoons Bicarbonate of Soda
- 2 tablespoons Golden Syrup
- 250g Butter
- Set the oven to 160℃.
- Line a tray 30cm x 20cm with grease proof paper.
- Mix all the dry ingredients together in a large bowl.
- Place the butter into a separate bowl and gently microwave until melted.
- Stir the syrup into the melted butter.
- Add the butter mixture into the dry ingredients and stir everything together until the oats are coated well in the butter and syrup.
- Spoon the mixture into the prepared tray and firmly press the oats into the tin and bake for 20 minutes or until golden brown.
- As soon as the crunchies are cooked, cut into the desired shapes and sizes. (See notes)
- Do this while the mixture is still warm, as when they cool they are too brittle to cut without crumbling.
- Enjoy your simple yet delicious treat.
You can make these Crunchies in any tin you have or any depth you want, they are not fussy.
Make sure you really press the oat into the pan this will ensure the mixture form a biscuit and not a cooked crumbs.
Work quickly the to cut into your desired shapes.
Idea:
I like to cut a ⅓ of the tray into long bars, ⅓ into squares and a ⅓ into diamonds shapes.
That way you can have some for lunch boxes, some as a little treat and the diamond shaped crunchies can be offered to a friends who pop in for a coffee.
![]()

Just tried this recipe… absolutely delicious! Used coconut palm sugar, maple syrup instead of golden and didn’t have quite enough dessicated coconut so topped up with ground almonds… cooked for 14 minutes and they are slightly crispy on top, deliciously gooey underneath… absolute winner!!
Hi Louisa
Delighted you tried the recipe and loved it. Thank you for sharing your tweaks. My healthy readers will be happy to hear they work with a combination of different ingredients not just cane sugar. Lots more good recipes for you to try. Have you made my Vegan Bars yet? Thanks again for your support. Marissa